
One of the essential elements of the Newspaper Theme is a row. It is a container that is used to put every element in coherently, one after the other. This way, it can create different types of layouts. But how does one make the row stretch all across the page or split it into columns? Let’s explore some of the basics in today’s tutorial.
Row, Add, Delete, Duplicate
Open a page or template with the tagDiv Composer. It can be either imported straight from the Cloud Library or crafted from scratch. Now, whenever you scroll upon various elements, you can see a blue bar appear at the top of the row with a few options.
- If you click on the row button, it will open the General Settings tab for that row.
- The next icon duplicates the current row with all of its content and settings.
- The column button behaves the same as the row button.
- Whichever element you’re scrolling over can be opened by clicking on the element button.
- You can also duplicate the element with the second icon in the bar.
- The last icon deletes the current element you’re scrolling over.
These icons are essential for everyday basic functionality. Acquaint yourself with them, and things will become much more manageable while editing and crafting a beautiful page.
To delete a row, you can also scroll over the row button, click on it and drag it to the bottom-right corner of the page. A delete pop-up will appear, asking you to confirm the deletion. The same can be done for the column and any element on the page.
General Settings tab
Let’s explore the first few options you can see when opening the row settings:
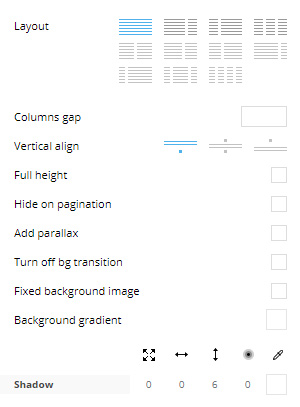
- The Layout lets you split the row into multiple columns. Just click on the icon, and you can see the changes happening live.
- Columns gap lets you increase or decrease the space between columns. All you need to do is write down a number in the box.
- “Vertical align” adjusts the position of the content. From left to right, the icons adjust the content to the top, middle or bottom.
- The Full height option makes the row have a set value in height.
- If you check the “hide on pagination” box on templates that require multiple pages (such as Category pages), the row will be hidden.
- The “Add Parallax” option applies only if you have a background image set on the row. It will move the image slowly up and down as you scroll past the row.
- With the “turn off bg transition” checked, when the page loads in, if you have a background image set on the row, it loads instantly and won’t gradually fade in.
- A fixed background image stays in a fixed position when the user scrolls down the page.
- Choose colors and create a beautiful background with the background gradient.
- The Shadow properties allow you to give the row its own shadow. The first setting lets you input the size of it. Whereas the next two options lets you offset it vertically, and horizontally. Next up is the spread – this measures how far the shadow should go. And lastly, you get to choose the color of it.
YouTube & Sticky Rows
The last few options left are the YouTube ID, class, and making the row sticky.

- If you check the “Sticky” checkbox, the row keeps being displayed even if you scroll past it. The dropdown menu lets you choose whether it should be shown at the top or bottom of the page.
- To give your row more life, you can add a YouTube ID in the box that will play a YouTube video automatically, muted, on loop. Pick the YouTube video you want to display and copy & paste the numbers and letters that come after watch?v=
- You can also choose to start the video at a set time by inputting the number of seconds in the box.
- If you want to increase the size of the video, use the scale box.
- The opacity slider controls how visible the overall video will be.
Row Stretch
One of the most critical features for a row is its stretch capabilities. A row can stretch all the way across the page horizontally. That is something you can do through the tagDiv Composer using the stretch row dropdown menu. When you first click on it, you can see the various options presented to you:
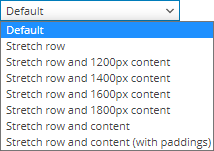
- Default is 1080 pixels wide, and if you set a background color, it will be constrained within those pixels.
- The stretch row keeps the 1080 pixels width but allows the background image / color to stretch across the page horizontally.
- Stretch row and 1200px/1400px/1600px/1800px content adjust the row according to those sizes written.
- Stretch row and content allow you to expand the row until it hits the left and right margins of the screen.
You also get the option to “stretch row off.” Once you hit this checkbox, you can see the background color stretch to the left and right sides of the screen. This works in the same way the “Stretch Row” option does.
Background Image
Just as we’ve seen above, you can add background images and have the image not change position while scrolling down or gradually move up and down with parallax. However, how do you add a background image on the row? For that, we need to travel to the CSS tab.
Under the CSS tab, you will first meet the varying options for margins and paddings.
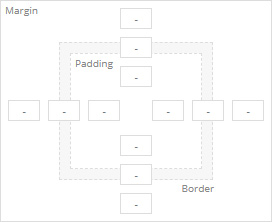
Each box refers to a different thing. The outermost boxes are the margins of the element, in this case, the row’s margins. The second most row, the one in the middle, is the border. Suppose you want to add a border spanning all the way across the row, you would need to input a number in each of the four second most boxes. The inner ones are padding.
Underneath all of that, you can choose the style and color of the border. However, what we’re interested in, lies even further below that: the background image. If you click on the background image option, it lets you choose a photo from the media Library or upload a new one entirely. Keep in mind, if the row is stretched horizontally (using the options mentioned above) the image needs to be large enough so that it maintains its high quality.
Background Image Options
Background style lets you choose how the image behaves with a dropdown menu:

- Cover makes the image cover the entirety of the row, stretching it in various directions.
- Contain shrinks or enlarges the image down to the height of the row.
- No repeat places the image into the row without stretching it in any direction.
- Repeat duplicates the image so that it spans all across the row.
The background position dropdown menu affects the image placement so that it shows the middle, the bottom or even the top of it using the background style settings.
And the last background image option is the background opacity. If you’ve chosen an image, you can lower the image’s opacity so that it only shows a bit of it, like a silhouette.
Row Layout & Divider
There are two more tabs when you open a row: the Divider and Layout tabs. The Divider lets you place a vector on the background of the row, creating various shapes to attract the viewer’s interest. Heaps of various geometrical forms can be achieved and maintain the contrast between different elements on the page. If you want to learn more about it, we have a Divider Tutorial on our blog.
The Layout tab covers many new features that affect the way your content is shown on the page. You can adjust the content within a column to display differently compared to the rest. Modify the order of columns for various devices, adjust the width of the row and columns, and plenty more. To explore these features, we suggest reading more about the Layout Options on our blog.
Conclusion
Now that we’ve explored all the varying degrees with which you can diversify and create interesting layouts using the rows in Newspaper Theme, it’s time to put this knowledge to good use. Open the tagDiv Composer and let your imagination run wild. Design something entirely new, filled with inspiration and creativity! Show us your best results in the comment box below.


just tell me how to remove ads from magazine pro theme , i cant remove that advertisement in front of logo , its not showing during editing in my browser but when i open it in different browser an ad or an error like spot.png… i have no option to remove it ??? slove my problem
daskhabar.com
Hi,
Removing the demo ads is very easy. The ad boxes can simply be removed using the composer, for example -> https://prnt.sc/zbPqm8KMhcQG I see you removed them in the meantime. If you have more questions, or if we can help with something else, please use the support forum or send us an email https://forum.tagdiv.com/newspaper-theme-support/ It will be much faster this way.
Thank you!
I paid for pro the theme keep showing ads on my page, how do I remove newspaper ads when editing the theme
Hi,
Some demos showcase simple ads, which are images related to the theme. They can easily be removed. PRO demos can be customized fully with the composer, please edit the templates with it and remove the ad boxes. Let us know if you need help with it. For support please use the support forum or send us an email https://forum.tagdiv.com/newspaper-theme-support/
Thank you!
I paid for premium subscription, but the theme keep showing ads on my page, how do I remove newspaper ads while editing the theme
Hi,
Please use the option to disable the advertisements, the setting is in the theme system status panel -> https://prnt.sc/4YEWgdXdPCYL We are sorry for the inconvenience.
Thank you!
There’s too many empty columns and don’t have idea about how to remove them.
Hi,
Rows can be removed in several ways, like dragging by the row icon and dropping to the bottom right corner https://prnt.sc/qVPNWZbOwCoC -> https://prnt.sc/z2P7ZIAkQeXx Or by clicking on the row icon and pressing delete on the keyboard. Or by right clicking the row icon and choosing delete https://prnt.sc/CYPpqTXZHU6l Please try your preferred method. Let us know if you have more questions, I suggest using the support forum or sending us an email https://forum.tagdiv.com/newspaper-theme-support/
Thank you!
I paid for pro the theme keep showing add on my page , how do I remove newspaper ads when editing the theme
Hi,
The theme advertisements can be disabled using the option from the theme system status panel https://prnt.sc/4YEWgdXdPCYL Please let us know if you have more questions, I suggest using the support forum or to send us an email https://forum.tagdiv.com/newspaper-theme-support/
Thank you!
How to unmute the video playlist?
Hi,
The playlist videos will be muted if you are using the autoplay option https://prnt.sc/LyMTUq6RlOr0 Most browsers do not allow having autoplay without having the muted parameter for the videos https://developer.chrome.com/blog/autoplay/ So unfortunately it will require unchecking the autoplay option in the playlist, and the website visitor can choose to play the video, with sound.
Thank you!
Hi. FYI, to delete a row you drag it to the bottom right, not bottom left.
Hi,
There was a mistake there, thank you for letting us know. I have corrected the post now. Sorry for the confusion.
Thank you!
hi i cant remove emty rows and empty spaces. plz help me. thank you.
Hi,
Sorry for the delay. If the problem you mention is still happening, I suggest contacting us by email at contact@tagdiv.com and we will take a look. Let us know.
Thank you!
Thank you, Alexandra.
I’ll keep this in mind, because I am new to Newspaper Theme.
Awesome! We’re glad you’ve found the information a useful one. Please let us know via forum or by email if you need any help with your Newspaper theme.
Thanks for the new update of Newspaper 10.