SPRING SALE! ENJOY 15% OFF

ON ALL WEB DESIGN AND DEVELOPMENT SERVICES

USE coupon

#spring15

in the contact page

Home Blog Page 19

Design better and faster with the intuitive Right-Click Menu

2

We’re introducing the intuitive Right-Click Menu in the tagDiv Composer page builder. Gain full control of your site with a whole new range of options and a natural way to create pages, articles, and layouts. With Newspaper Theme version 9.1, you can open any page or template right on the frontend and access a set of commands to enhance your experience while designing your website.

Clear, Duplicate, Delete, Copy, Paste, Save as Element are just a few of the new functions available. These features significantly reduce your development time!

Right-Click Menu Newspaper Theme

What is the Right-Click Menu?

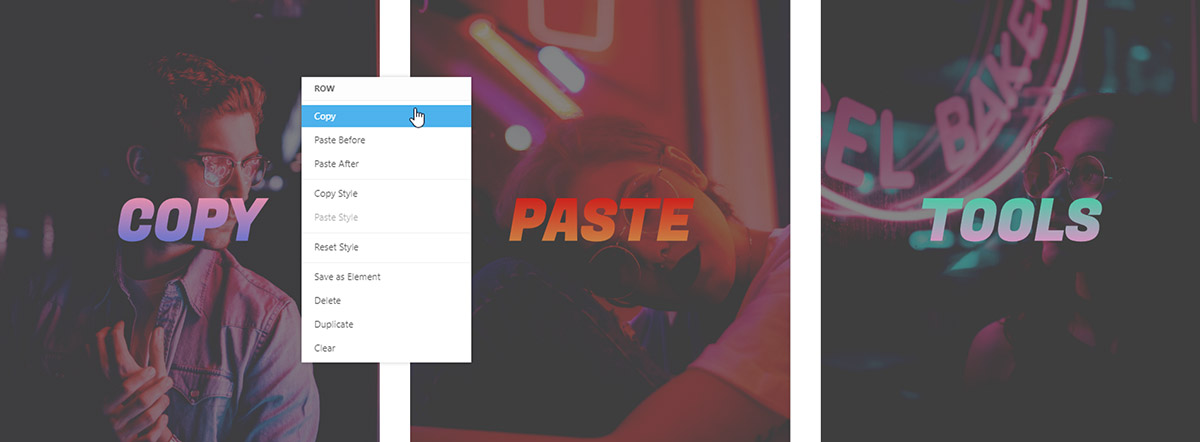
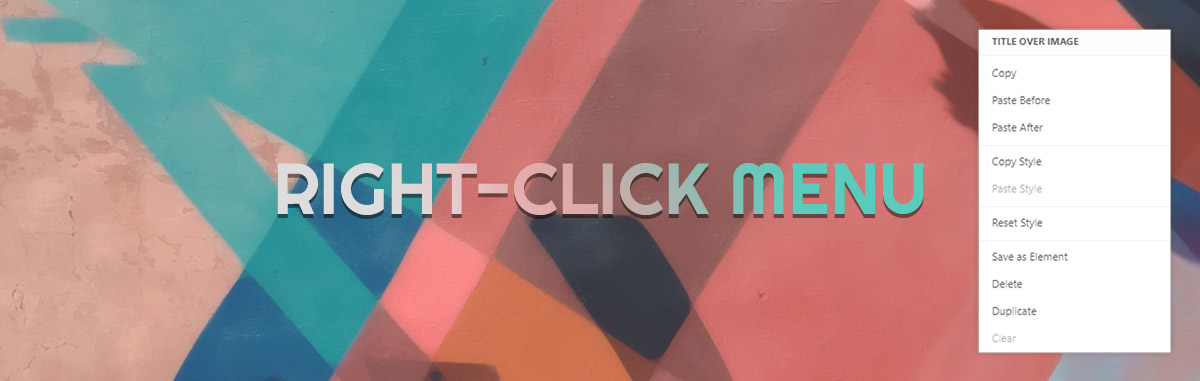
For example, open up the tagDiv Composer on a page or a Cloud Library template. Now, right click on an element, row or column and inspect the new menu that shows up. Each option brings you new possibilities for design:

  • The first three choices are the Copy and Paste tools. They allow you to duplicate rows, columns, elements and move them to different pages. Also, choose where to place the copied items: above or below.
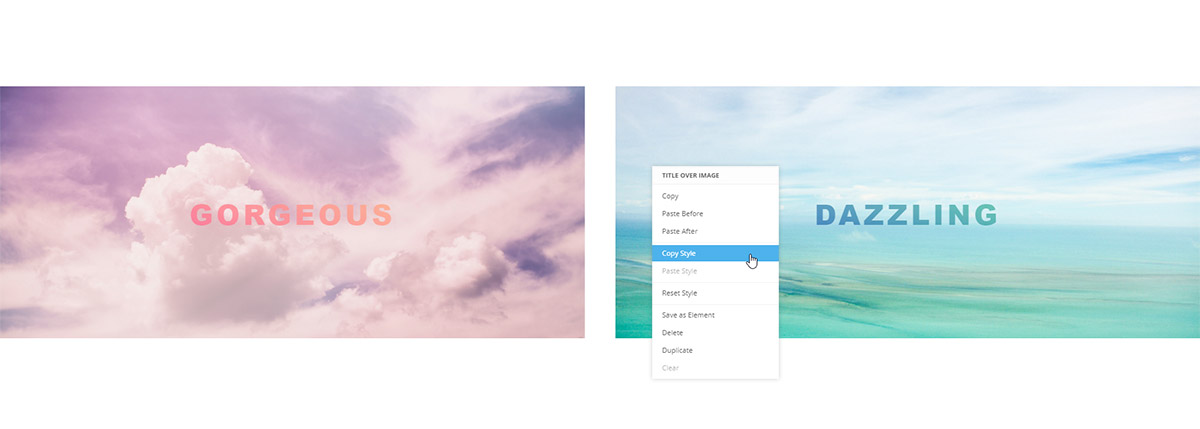
  • Copy Style and Paste Style help you move the adjustments made on a specific object to another one of the same type. Therefore, any adjustments to the text format, colors, overlays, paddings or margins can be transferred over with a single click.
  • Reset Style instantaneously clears all alterations such as colors, fonts, margins, paddings, and so on. As a result, the section reverts to its default settings.
  • Save as element allows you to keep any adjustments made to an object as a shortcode item. Hence, even if the browser gets closed, you can bring it back in a new page from the “Add Element” list. Locate it in tagDiv Composer then drag and drop it on the layout.
  • Delete option instantly tosses your undesired item into the trash. This is much faster than dragging it to the bottom right of the page in the tagDiv Composer. Try it out!
  • Duplicate makes a copy of any element and instantly places it below. Right now, you can not use it on columns.
  • The Clear command performs a wipe of an entire section. It deletes everything except the row or column.

Here’s why you should use the Right-Click Menu

Take into account the amount of time spent each time you design a new page or template. Now estimate how much you would save up by using these new commands. Duplicating items can be done without copying the shortcodes anymore. Do it with a few clicks.

The Right-Click Menu is intuitive and allows you to earn more time to create new ideas. Erase multiple items through the use of Clear. Moreover, the delete option is right there for use, too.

No need to remember or write down the numbers assigned to the padding and margins anymore! Be consistent through the page and your website by copying the styles of elements.

How about a little test?

Add a new page from the Admin Dashboard. Now, open the page through the Newspaper Theme’s page builder, the tagDiv Composer. Drag a Flex Block 1 into the page and modify its appearance: text formatting, padding, margins, colors. Did you obtain the perfect look? Great!

Now, right-click on it to bring up the menu. Select the Save as element action and name it. The item is then stored as a shortcode in the tagDiv Composer library. Why not test it? Right-click the block you’ve just saved, and choose the delete option.

It’s gone! No worries though, just click the Add Element button and scroll down the list to the bottom. Your item appears under the name you’ve chosen for it. Drag it onto the page and notice that all of your settings and filters have been saved with it. If you log out and close the browser, the shortcode remains there. You can access it each time you need it from the tagDiv Composer page builder.

Keep in mind that this is just the tip of the iceberg. The new Right-Click Menu makes the creation of new layouts more straightforward than before, so keep on using it!

Think of the Right-Click Menu as an Asset

While designing, integrate the new update’s features into your workflow. Access the Right-Click Menu to make tasks, such as duplicating items, simpler and way faster. Newspaper Theme continues to improve its user interface to give you the best experience while building your website!

Stay tuned for further updates of the Newspaper Theme, and write us in the comment box below mentioning how the Right-Click Menu helped you! ✨

Newsmag theme is part of the big WPML family

0

This is such an exciting day!

We are delighted to give you some great news: the Newsmag theme is compatible with the WPML Plugin. As a result, now all our customers have the power to reach more people, touch more cultures, as they can write content and translate it into different languages!

Whatever you write on your blog, online magazine or news website can easily be transmitted across all cultures in different languages. We’re happy when our clients are because when they prosper and reach their potential in exhibiting their work throughout various languages, reaching more people, creating new audiences.

Newsmag is getting more powerful and versatile while remaining constant in usage at maximum levels. We’re sure you can’t wait to gain access to the advanced translation management features and a professional content translation interface. The new compatibility helps you develop even more innovative websites without requiring any technical or coding skills.

Of course, the content is the most important thing, but the joined functionality between the Newsmag theme and WPML doesn’t stop here. Together, these two powerful tools help you accomplish more than just that. Multiple elements support translating, such as:

  • Categories and tags;
  • Texts from the Newsmag theme, plugins, and other places;
  • Menus.

It’s easy to start with the Newmag theme and WPML plugin. Install it, download the .po and .mo files and build a multilingual website. For more information on how to use this plugin, please access the Newsmag Theme Documentation.

How to use the new Copy and Paste tools for elements in Newspaper Theme

6

Have you ever struggled to get an exact section copied to another page? The tagDiv team has come up with a simple solution. The 9.1 update of the Newspaper Theme will bring you an entirely new list of commands by right-clicking in the tagDiv Composer page-builder. Two of these are the Copy and Paste tools.

Easily duplicate an element or section of your page. Move entire portions of the layout to different templates or pages, right on the front-end of your website. Say goodbye to the old fashioned way of copying items through the shortcodes and embrace the brand new feature for effortless results.

Copy and Paste Tools Newspaper Theme

Access the new Copy and Paste tools

Open any page or template through the tagDiv Composer and right-click on a row, column or particular element. A new menu pops up with various options ready for you to use. The Copy and Paste tools are there, too!

How does it work? Once you select an element, a section, a row or column, you can copy and then paste it on a different page in a different tab, or on the same page. When you do, it gives you the option to place the content above or below the chosen spot.

By using the Copy and Paste tools, everything from links, text, images to the style of the item or section are duplicated. This includes any adjustments made to the element, such as colors, text formatting, paddings, and margins.

Uses for the Copy and Paste tools

Wondering what to do with these new commands? Here are some fun ideas for you to try out:

  • Copy a row with all of its elements and navigate to a different page. On the front-end editing section, right click and then choose Paste Before or Paste After to place a copy below or above a different item.
  • Use the tools to duplicate elements easily without having to drag and drop them again from the tagDiv Composer.
  • If you have several templates imported from the Cloud Library, easily add the same section to each and assign them to different posts. You could easily have multiple Single Post Templates, each designed differently, yet with one consistent aspect: a row containing the author’s name, date, and social network links.
  • Position the duplicated items above or below another item for your convenience and ease of access.

Details, details, details

Let’s start a more thorough explanation. Add a new page or Cloud template. Now, since this is a test, name the page whatever you want. Open the tagDiv Composer on it and add a Title for the page, and a Flex Block 1.

Modify the margins, padding, text formatting, add colors to the title, hide or show elements of the meta info, exactly like you desire. Moreover, remember you can always revert any changes with the undo button! Once you obtain the perfect layout, Save the settings. Now, let’s move the created row with all of its elements on a new page. Therefore, right click on the row and select Copy.

Navigate to a new page and choose where to add your row. This time, with the command menu opened, pick between Paste After or Paste Before. One choice places your copied row below a different element while the other above it. Don’t confuse it with the Duplicate option, since the copy and paste tools come with position functions and work between tabs.

You could also use the Copy and Paste tools for a consistent design across various pages. No need to drag and drop the same element multiple times on a page! Use the new menu to duplicate it.

Benefit from the Copy and Paste tools

Knowing how to take advantage of these two new features should increase your productivity while designing your website. So, reap the benefits with Newspaper Theme: multiply various elements on a page, choose to place them above or below different parts of the layout, move your content around faster than ever before!

If you’ve tested the new tools out, tell us of any new surprising advantages to using them in the comment box below! ?

Copy – Paste the Style of your elements in Newspaper 9.1

0

When building and designing a new page, creating multiple elements with the same aspect may prove tedious. The Newspaper Theme v 9.1 helps you reduce the development time by cloning the appearance of a section with the brand new Copy and Paste Style features. It improves your workflow and gives you more time to focus on creating the content for your website.

Copy Style And Paste Style For Image Boxes

What are Copy Style and Paste Style Features?

The new update of the Newspaper Theme brings a new and intuitive functionality. With the tagDiv Composer open, right click on any element on a page, and you should notice a string of new commands show up. Together with them are the Copy Style and Paste Style features.

The role of these two new options is to transfer the styling of a section to another in the blink of an eye. Hence, if you have a two, three, maybe even four buttons on a page, you can design one, copy the look and apply it to the others. It works with all elements of the same type, for example, two Posts Loops, Flex Blocks 1, Author boxes, and so on. Consequently, the title’s color gradient, the colors, the text formatting, the padding, margins, borders are all going to be copied to the other element you choose.

Why use Copy Style and Paste Style features?

There are many reasons to use these brand new functions, so why not give it a test and try them out:

  • Having multiple elements that need a uniform look has never been easier! Reduce the time spent on designing with the new menu pop-up menu.
  • No need to write down the padding, the text formatting, the hex number for colors that you’ve used on the same element to multiply it. The Copy Style feature does it for you!
  • If you open different pages in different tabs, you can still transfer an element’s properties from one of the pages to the other. However, it has to be on the same domain, so if you have two sites using Newspaper, you can’t transfer the styling in-between the two for the same elements.
  • Create different looks for each device in a more natural way with the new Copy Style and Paste Style features.

More in-depth

Update the Newspaper Theme to the 9.1 version so you can benefit from this feature (alongside many others in the Right-Click Menu). Now, open the tagDiv Composer on a blank page. Add a row and split it into 3 columns. Drag and drop an Author Box element and a button. Now customize your Author Box and make it appealing.

What about making the Author Photo bigger? Maybe change the photo radius, too. You can give the text a different color, modify the size, line-height, tracking, and font-family, too. If you make a mistake, use the undo button to go back to the previous design. Before you move on to do the same to the next two author boxes, right click on the altered one. Choose the Copy Style option. Now, open the menu on the non-modified author box and this time click Paste Style. That just transferred your adjustments, didn’t it? Awesome!

For the buttons, how about you give each button a URL, icon, and text? Now, start designing the first one. Button style, colors, gradients, hover colors, text formatting, create it the way you like. Done? Great! Right-click the newly adjusted element and select Copy Style option. Move your cursor to the second button and choose Paste Style. It’s that easy!

Results and opinions

Try these two new features right now! Remember, you can use them in-between tabs, too, as long as the pages are on the same domain. Now, it’s easy to maintain a consistent aspect for multiple elements with these impressive right-click features.

Test it out with the Newspaper Theme, and tell us how much time you’ve saved ⏳  by designing multiple sections in a row!


Category Templates: ‘How to’ Tips and Useful Best Practice Examples

When starting out, did you have a plan on how to organize your website? How to design it? If not, it’s never too late to start doing so. Categories are like labels that can be attached to individual blog posts. Readers can use them to browse through different blog posts of the same tag. Whereas, Category Templates are layouts that alter the design and shape of a page.

Newspaper Theme offers you 16 new Category Templates for your website. Use them to spice up a page and offer new looks for it. Organize all elements of the page visually, based on its content.

Why it’s important to keep your categories neat

The primary purpose of Categories is to organize your blog for readers. Use them to communicate the benefits of reading your articles and posts. Help the audience navigate your blog easily, find more interesting posts to read, and stick around for a while through Categories.

As such, for better communication between you and the viewers, there needs to be a common ground. What is that? Do some research to answer that question. What are the posts that get the most traffic? Comments? Shares? Those are the topics that interest people so give them their category.

Here are a few suggestions on how to better organize your Categories:

  • If any Categories have less than 10 posts attached to them, consider deleting them. Move each post into different categories. It’s common practice to have categories that contain many articles so readers can browse through them.
  • Be aware of user experience. Keep all Category names to a minimum of 3 words while keeping the subject as concrete as possible. Instead of titles such as Web Wizardry, use Web Design. Try to think of it in ways that people find topical information.
  • Do you have a niche website or cover topics from different areas of interest? For a lifestyle blog, some categories could be fashion, makeup, hairstyles. However, for a blog that centers around shoes, there can’t be only one category labeled shoes, you would need a category for the type of shoes: sneakers, heels, boots.
  • Consistency is the key. Capitalize or keep the title lowercase, but do so for each Category name. Also, for blog series, consider whether it’s going to have more than 10+ articles and if not, then attach it to a broader category tag.

The reason behind Category Templates

User Experience is what will lead you to re-organize all Categories. Rename specific Categories to make the titles accessible to the readers, and keep them consistent. The easier it is for a new reader to browse through them and find what they’re looking for, the better for their overall experience.

It’s the small things that matter, what pushes the readers to choose your site over another. That small padding to the side? It may not be noticeable after staring at the same layout for a while, but the audience notices it. These seemingly insignificant details are what makes your design better than another.

Another factor that contributes to the User Experience is the responsiveness of your website. It impacts the way viewers perceive any website. Newspaper Theme has the option to see how the website looks like on different devices and adjust the layout accordingly. Keep that in mind while designing and you’ll be reeling in readers left and right.

How to add the new Category Templates on your site

Newspaper Theme comes with 16 original Category Templates for you to try out. With the Cloud Library plugin open, navigate to the Category tab. Look through each design offered. Click on the one you like and import it. Once imported, go to the Newspaper Theme Panel and open the Categories tab. Do you want this template to be assigned to all of your categories or only to individual categories?

For site-wide, under the Category Global Settings, choose the newly-imported Template in the drop-down menu Cloud Library Template. Save the settings.

To add a new layout to a  specific category, scroll down the page to Per Category Settings section. Choose the Category you want to apply it to and select the newly-imported Template in the drop-down menu Cloud Library Template.

Customize and design your own Category Template

If you want to create a custom layout for a Category page, you can easily do so. In the Cloud Library, under the Category section, choose the Blank Template. The tagDiv Composer, our front-end page builder,  automatically opens up to help you create the new layout.

You can now add elements to the page using drag and drop. Add:

  • Breadcrumbs
  • Page Title
  • Category Description
  • Posts Loop element
  • Authors Box
  • And anything else you can think of.

Arrange them on the page however you want. Choose to divide the rows into columns, modify the paddings or margins of the elements, change their positions, and pick the fonts to be used by each section. Is the page everything you’ve wanted? Great, now Save the new layout.

To rename your new template go to the Cloud Templates page and click Edit. Choose a fitting title. Assign the layout site-wide for all Categories or only on specific ones by following the same steps as described above for the imported Category Templates.

Watch the Video

To sum up

The readers notice each decision made regarding the content and design of your pages. Whether it’s something small like altering the layout a tiny bit or something bigger like organizing the category lists to make more sense, everything can affect your visitors’ impressions of the website. Try to keep things neat, and don’t clutter elements.

If you have some beautifully-crafted ? Category Templates, share them with us in the comment section below! And, as always, feel free to share your experience using the Newspaper Theme!

How to Easily Customize WordPress Search Results Pages with Newspaper Theme

12

Do you manage a website with a significant amount of content? Don’t let the old articles get overshadowed by your novelties and increase the visitor’s chances of finding valuable content with a search page and form. For good usability, set up a search form and a beautiful search page. It helps your readers find and interact with articles, pages, and posts relevant to their interests.

Search Page Templates Travel

Origins of the Search Page and Search Engines

Before September 1993 the World Wide Web was entirely indexed by hand. There was a list of web servers that Tim Berners-Lee edited and hosted on the CERN web server. The first tool used for searching content (as opposed to users) on the Internet was Archie. It created searchable databases of file names by downloading the listings of all files located on FTP sites.  However, the amount of data was limited.

The first search engine widely known by the public was WebCrawler. In contrast, it allowed users to search for any word in any webpage. Does this sound familiar? That’s because this is the standard for all search engine nowadays.

A search engine indexes websites and helps people find information relating to the query as quickly as possible. The WordPress search function works the same way. A query from your visitor can be a single a word or a few keywords. The search function compares them with your blog post’s content, categories, tags, titles, excerpts information. Very thoroughly.

The Search then redirects you to a new page: the search page. It displays the results matching the queries. Relevant pages, posts, articles to the input keywords.

Antarctica Search Page Templates

How to set up Custom Search Page Templates

Newspaper Theme introduces a method to customize the appearance of your search page with templates. In the tagDiv Cloud Library, navigate to the Search tab. Choose the template you like and import it.

For further adjustments, alter them now and then hit Save. To assign any Search Page templates as default for your website, click the Newspaper Theme Panel. In Template Settings, open the Search Template section and choose the one you have just imported into the Search Templates drop-down menu.

Save your settings and the new Search Page will be available for visitors. Enable the form for your site’s header. Go to the Newspaper Theme Panel and then to the Header Style tab. Set the Search Position to either Default or Top Bar to display it site-wide.

Search Page Templates

Even more customization: Blank Search Page Templates

Do you want to set up a Search Page and design it according to the rest of your site’s appearance? Instead of an already crafted layout, import a Blank template in the Search section.

Add a Search Form and a Posts Loop element. Style them however you want:

  • Change the Input Form’s background color, text color
  • Modify the font families to fit with the rest of your website
  • Easily adjust the Posts’ padding and spacing
  • Show or hide elements of the meta info for your posts
  • Choose whether to display one or more posts on a row

Once you’re satisfied with the changes, save the settings. Assign the new layout to your website. Navigate to the Newspaper Theme Panel and in Template Settings, open the Search Template section and select the new page. Make sure that your site has a search form attached to the header. In the Header section, under Header Style Tab, pick either Default position or Top Bar. Now, save, and you’re done!

Why use Search Page Templates?

Here are a few reasons to use a Search Page:

  • Enable the search form option to allow visitors to navigate your site and find relevant articles that appeal to their interests, thereby increasing the number of clicks.
  • Monitor the query data to create and write relevant content to your visitors’ interests. This can also be used as insight into what users think about your site.
  • Keep your visitors engaged. Increase the click-through rate and conversions through the Search Function.
  • Templates for better User Interface. Design them and make the perfect layout for your website and readers!
  • Numerous customization options to either set a Search Page apart from the rest of your website or to integrate it even better with the rest of it.

Conclusions

Let your audience engage with your website by implementing a Search Page template. The Newspaper Theme brings unlimited customization options for you to explore. Experiment with templates and test to find out what works for you and your website’s appearance!

Have you designed an entirely new Search Page template? Keep us updated in your creative outings in the comment box below. 🙂

How to Set and Customize an Author Page Template

25

You’ve written numerous articles and posts over the years. Maybe different writers are helping along with content creation, too. Have you set up an Author Page? Let the readers discover more about you using a witty description. Add social links that let the viewers follow you through countless endeavors.

Easily design an Author Page for all your writers. Our talented team has built various customizable templates that can be browsed through so you can choose the right one.

How to get and assign an Author Page template

The Newspaper 9 Theme, and the Cloud Library plugin, make it easy to add an Author Page. Just click on the Cloud Library and navigate to the Author Page tab. Press the Live Preview button to see how each one looks on a page.

Import the one you like the most.

You can also create an Author Page by clicking on a Blank Template. Through the tagDiv Composer page builder, drag and drop elements such as:

  • The Author Name
  • An Author Image
  • Author Description
  • Author Socials
  • The Author URL

Arrange them on the page the way you want. Add margins or padding to adjust the layout. Give the Blank Template a name to easily identify it.

Newspaper Theme: Author Page Templates in the Theme Panel

Easily assign an Author Page template to your user

With Newspaper Theme, you have the opportunity to give each of the writers a different page look. All you need to do is assign the newly designed layout to the desired user. Navigate to the Newspaper Theme Panel then to Template Settings. Expand the Author Template section. From here you can apply the same page design to all of the writers (General Author drop-down menu) or assign a different one for each user from the Individual Author Templates.

To see how it all looks, in the WordPress Dashboard, go to Users. Then, hover over the writer you applied the template to, then click View. This is the exact page displayed to the visitors when they click on the content creator in your articles and posts.

Why use an Author Page Template?

Author Templates give you endless design possibilities. It can perfectly integrate with the rest of your website or stand out from the rest.

A beautiful Author Page can influence your overall visitor engagement. Each user should have a picture of themselves as an icon. This way the audience can associate a face with the person that created the content.

Author Page Template For Sabrina Hepburn

To make it even more personal, write a biography to give the readers information about your interests and daily life. Give them a glimpse of the motivation that empowers your writing, so they have an excellent reason to relate with your content. Most importantly, keep the tone of the biography as formal or as casual as you want.

A beautiful Author Page is a great start to building a community as the audience can follow you on all the social networks and directly engage with you.

Engage, share and keep writing

Minimalistic, bright, colorful or somber? The Author Page is a reflection of your writer’s persona. Treat it as a way of interacting with the readers. From social networks links to the image you display for them, engagement is the ultimate goal. Moreover, with the Newspaper theme, you now have unlimited designs at your fingertips for the new Author Page.

Show us your original designs for your Author Page in the comment box below! 😎

Introducing the New 404 Page Templates

12

In the cases of broken URLs or missing links, servers respond to a request with a numerical code. The first digit of the 404 indicates a client error, while the following two digits indicate the specific error: missing page.

Some common causes for a 404 error are: if you delete or move the content of a page, miswrite the URLs, use incorrect links, non-existent or expired domain names. If your site has hundreds or thousands of pages, it’s almost impossible to avoid hitting a 404 error page.

404 Page Templates Kite

Origins: myth or not?

The origins of this error are supposedly a little tale about a room 404 in the building that housed the web’s first servers at CERN (the European Organization for Nuclear Research). This room held the internet’s central database. To answer requests for files or pages, a few people would manually make the request. When the internal network grew, so did the requests hence, also the amount of work for the people working in that room. As such, some requests could not be met, and henceforth the 404 error was born.

However, one of the pioneers of the world-wide-web, Robert Caillou, denies this tale. According to WIRED, during an interview, Robert claimed that such a tale was abhorrent and erroneous. This idea may have come due to the nature of a 404 error: the pure disappointment at an unanticipated problem, a reminder that everything is fallible.

404 Page Templates Orange

Perfect 404 Page Templates for your site

After a brief outlook of its origins, we can now move to the topic at hand. Inevitably a few of your visitors will see the 404 error page, so it is important to set one up. Use it to redirect them back to the homepage. With Newspaper Theme, you now have access to 11 new 404 page templates that you can import on your website.

From ‘Outer space’ as a central theme to ‘Nature,’ pick the best 404 layout for your site. Each one is custom designed by our team to be eye-catching and attractive.

How do you get the 404 Page Templates?

That’s easy. As long as you have an active Newspaper Theme version 9, you can begin. Make sure the tagDiv Cloud Library plugin is installed, too!

Navigate to the Cloud Library and then to the 404 Tab. You can click on each template and preview them to see a full-width version. Choose the one that best fits your website and import it.

The template’s front-end editing section automatically opens. Modify the text and title of the page to motivate the visitors to continue browsing your website. Click the button on the page and then, in the URL bar, add your website’s homepage to redirect the audience back to it.

Save the settings, and assign it. Now, when your visitors get a missing page error, they can see your newly imported and edited template. All beautiful and ready to appeal to your audience.

Of course, let’s not forget that you also have the option to create your own 404 page templates. Just use the Blank Template from the Cloud Library and the tagDiv Composer page builder and create your own stunning layout. How? It’s simple. Add an image to reflect your website’s style, a message, and a title. Now, add a button to redirect your visitors.

To assign it, navigate to the Newspaper Theme Panel. Open the Template Settings and under the 404 Template section, choose the one you want to use site-wide. If any of the users access a broken link or missing content, this new 404 page shows up.

404 Page Templates

Wrap up

In essence, on websites with a large amount of content, avoiding a 404 error can be difficult. With a 404 Page Template, you can make sure that when an error happens, your visitors see an engaging page that guides them back to your homepage instead of rushing out of your website. Make your job easier by importing an already crafted template from the Cloud Library.

Did you make your own 404 template with Cloud Library? How does it look? Comment down below and show us your creative error pages and designs. We’d love to hear your thoughts on this feature. 🙂

Discover the Flex Blocks For More Customization

16

Finding the right, modern design for your WordPress website can be quite a challenging task, yet, with the new five Flex Blocks and the powerful Newspaper Theme, everything becomes easy. In traditional web design, blocks are used to display the posts and articles in a specific layout for the audience.

A Flex block, however, gives you a lot more room to personalize the content and control every detail of its appearance. Take a dip into how the new Flex blocks can make your site’s layout unique and more original.

Flex Blocks: Autumn Scene Newspaper Theme

Welcome to the New Flex Blocks

Browsing through the tagDiv Composer elements, you’ll find 5 Flex blocks available to use. With them, you can easily recreate all the past 25 blocks from the Newspaper theme but with more flexibility than ever before. Drag and drop a Flex block right where you want and play around with the settings.

Here are a few things you can change about the new Flex block:

  • Choose the number of posts to display
  • Filter the content you would like to show by Categories
  • Modify the radius of the featured image of the article to create rounded corners or even perfect circles
  • Select the desired font families for your excerpt, article title, meta info, or even the category tag.
  • Adjust the padding and spacing of each element to obtain the ideal form for your Flex block
  • Show or hide the category tag, author name, date, comment number or/and excerpt


Change everything about the Flex block easily within a few clicks. Take a look at the settings in the Layout tab and experiment. If you don’t like the results, you can quickly go back to what you had before. To do so, press the undo button or hold ctrl + z.

Endless design possibilities

Did you know there’s an easier way to get the perfect section for your page? Navigate to the tagDiv Cloud Library and browse through the “Blocks” panel. Found something you like? Import it with a single click, and it will be dropped into a blank page. Now set up the page to look as you want it to be.

Alternatively, you can open the tagDiv Composer on an existent page. Press the Load Template button to access the Cloud Library. Choose the block you want, and import it to your page. Drag and drop it where you want, and you’re done.

Flex Blocks: Rounded Images Section in Newspaper Theme

Why the new flex blocks are perfect for your site

If you’re still having doubts about using a Flex block on your pages, here are some reasons to help you decide:

  • Versatility. A Flex block comes with a lot more settings than a regular block. You can play with it to change the look and feel of your page.
  • Simplicity. Flex Block 1 comes with a Premade Style Presets button that brings you various, modern designs for the same element with a few button clicks. Our team developed them based on the latest trends in post styles to make your creative effort seamless.
  • Fluidity. The new Flex blocks are user-friendly and responsive. This means that you control the way your content appears on each device. Use it to catch your audience’s attention.
  • Originality. Style the Flex Blocks to create an entirely new and unique result easily by modifying the settings in the Layout tab. You can start with the image radius, padding, and spacing. Then add a divider between your modules and change the font family.

Final thoughts

Experiment and have fun with Newspaper Theme! The new feature should ease your workflow and give you more choices to design the layout of your pages. It also brings you more freedom to express yourself. Also, don’t forget to keep it mobile-friendly as it is an essential factor for your audience 🙂

Have you used the new Flex Blocks, yet? Comment down below to share your thoughts on them and how they impacted your workflow.

Newspaper Theme: Click to Design with Premade Styles for Flex Blocks

0

A preset is a series of settings that change the design of the element you’re working with on a page or article. The Newspaper Theme, with its latest update, introduces multiple presets that allow you to adjust the style of the Flex block. Simple, just like turning a switch on or off. The settings modify the internal CSS code to give you a spectacular result without any effort.

Through much research, our design team has created them based on the latest trends. They work well with one another, just like peanut butter and jelly.

What can you do with Premade Styles?

Imagine how much time you can save by trying out what would look better in an instant. Let’s say you alter the padding of the box, the vertical alignment of the posts’ images, and change the font families to suit the rest of your website’s.

The Premade Styles feature lets you experiment with different looks for your blocks easily. There’s no need to change each setting in the Layout and Style panel to test different designs. You can do everything within a few clicks.

How to use Premade Preset Styles

All you need to get started is a working Newspaper 9 Theme and Flex block 1 on your page. Once you have these, click on the element. Then in the top left corner of the General panel, you can see the Premade Style Presets button. Press it.

Now you can access a list of predetermined looks and switch between them to test whatever works best for you. For example, start by changing the font family, the alignment of the text, the size of the title or even the aspect ratio of the featured image. You have the option to show or hide specific elements such as the excerpt, author name, category tag or even the comments.

For further adjustments to the block, navigate to the Layout or Style panel and play with the settings until you get the perfect layout. If you need any further information about the Flex Blocks, check out this blog post.

In Conclusion

The main difference is that now you can quickly test new looks by just accessing these settings. If you already love creating unique layouts with Newspaper Theme, you can still make adjustments the same way you were used to.

Feeling creative? Customize your Flex block as you like it. Don’t forget to post the results in the comment box below to share it with us and our audience.